
Create a Support Request in Zafago Portal Step by Step
Zafago Portal allows users to create and track support requests directly from the Help Center. Instead of explaining an issue through scattered messages, customers can select the relevant platform and category, provide detailed information, attach supporting files, and monitor the ticket until it is resolved.
The process is designed for everyday advertising operations where users may need assistance with advertising accounts, campaigns, stores, policies, transactions, or other Portal-related activities.
Creating a request takes only a few steps: access Support, open Create Support Request, select the appropriate options, describe the issue clearly, attach supporting files when necessary, and click Create Request.
After submission, users can return to My Tickets to monitor whether the request is still Pending or has been Resolved.
This guide explains the complete process and shows how to prepare a support request that is clear, accurate, and easier to review.
Zafago Portal Support provides a centralized Help Center for customer requests
Zafago Portal Support gives users one place to create, organize, and track requests related to their advertising operations. The Help Center separates new request creation from ticket tracking, helping customers submit structured information and later check whether each request is still pending or has already been resolved.
Advertising support can become difficult when a business operates multiple accounts, platforms, campaigns, or markets at the same time.
An agency may manage different TikTok accounts for several customers. An ecommerce business may run separate accounts for each product or country. A media team may need help with an account while the finance team is reviewing another activity.
In these situations, a generic message such as “my account has an issue” provides very little context.
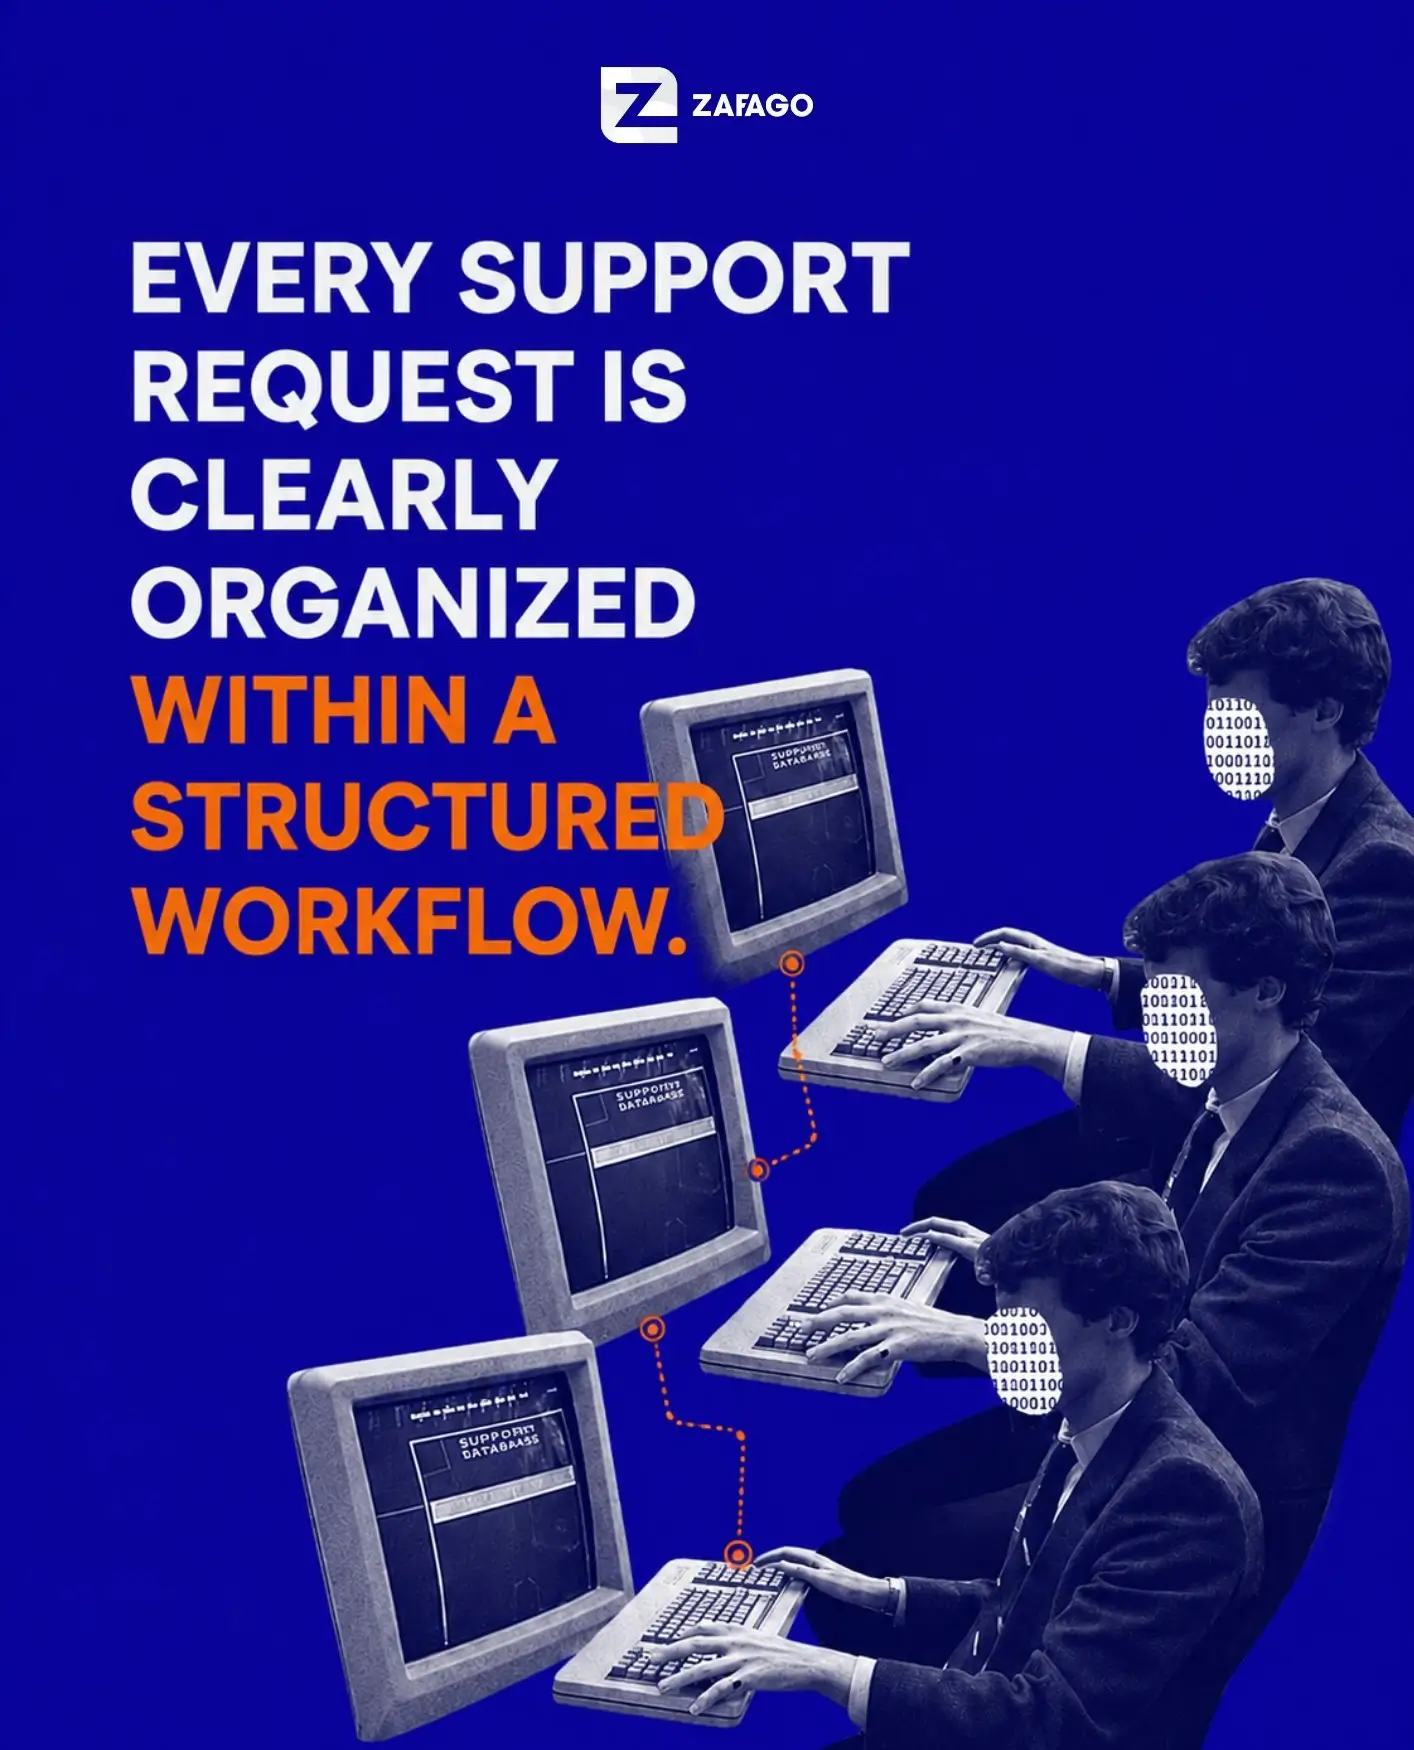
The Help Center creates a more structured workflow.
After entering Support, users can choose between two main areas:
- My Tickets for reviewing existing support requests.
- Create Support Request for submitting a new issue.
The My Tickets area separates requests into Pending and Resolved statuses. This allows users to return to the Portal and see whether a request is still being processed or has already been completed.
The second area, Create Support Request, opens a form where users can identify the platform, choose a category, write a request title, enter detailed information, and attach supporting documents or screenshots.
This approach keeps support connected with the same Zafago Portal environment used for advertising operations rather than treating support as an unrelated communication channel.
Creating a support request starts by opening Support from the account menu
Users can access the Help Center by opening the account menu in the upper-right area of Zafago Portal and selecting Support. This takes the user directly to the support environment where existing tickets can be reviewed and new support requests can be created.
Step 1: Open the account menu
From the Portal interface, click the account or team area displayed in the upper-right corner.
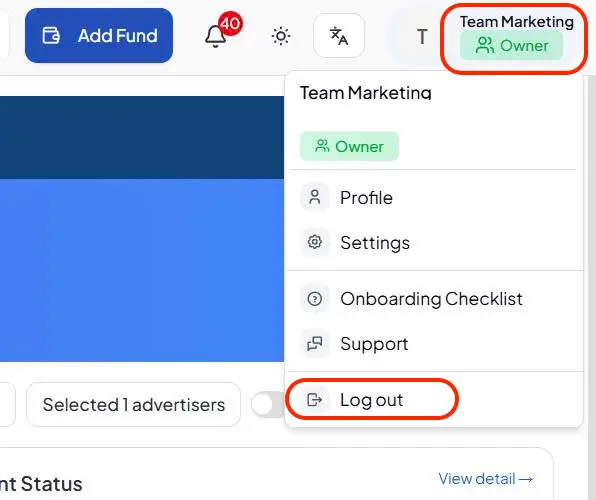
The menu includes options such as Profile, Settings, Onboarding Checklist, Support, and Log out.
Select Support.
The Portal then opens the Help Center.
Before starting a new request, it is worth identifying the exact issue that needs assistance.
A simple way to prepare is to complete this sentence:
“I was trying to [action] on [account/platform] when [issue] occurred.”
For example:
“I was checking my TikTok advertising account when I noticed an unexpected account status.”
This provides a much clearer starting point than:
“My TikTok account has a problem.”
The difference becomes important when a business manages several advertising accounts at the same time.
For customers using Rent TikTok Agency Ad Account or TikTok Advertising Account Management, clearly identifying the affected account can help separate one issue from other accounts being managed in the same Portal.
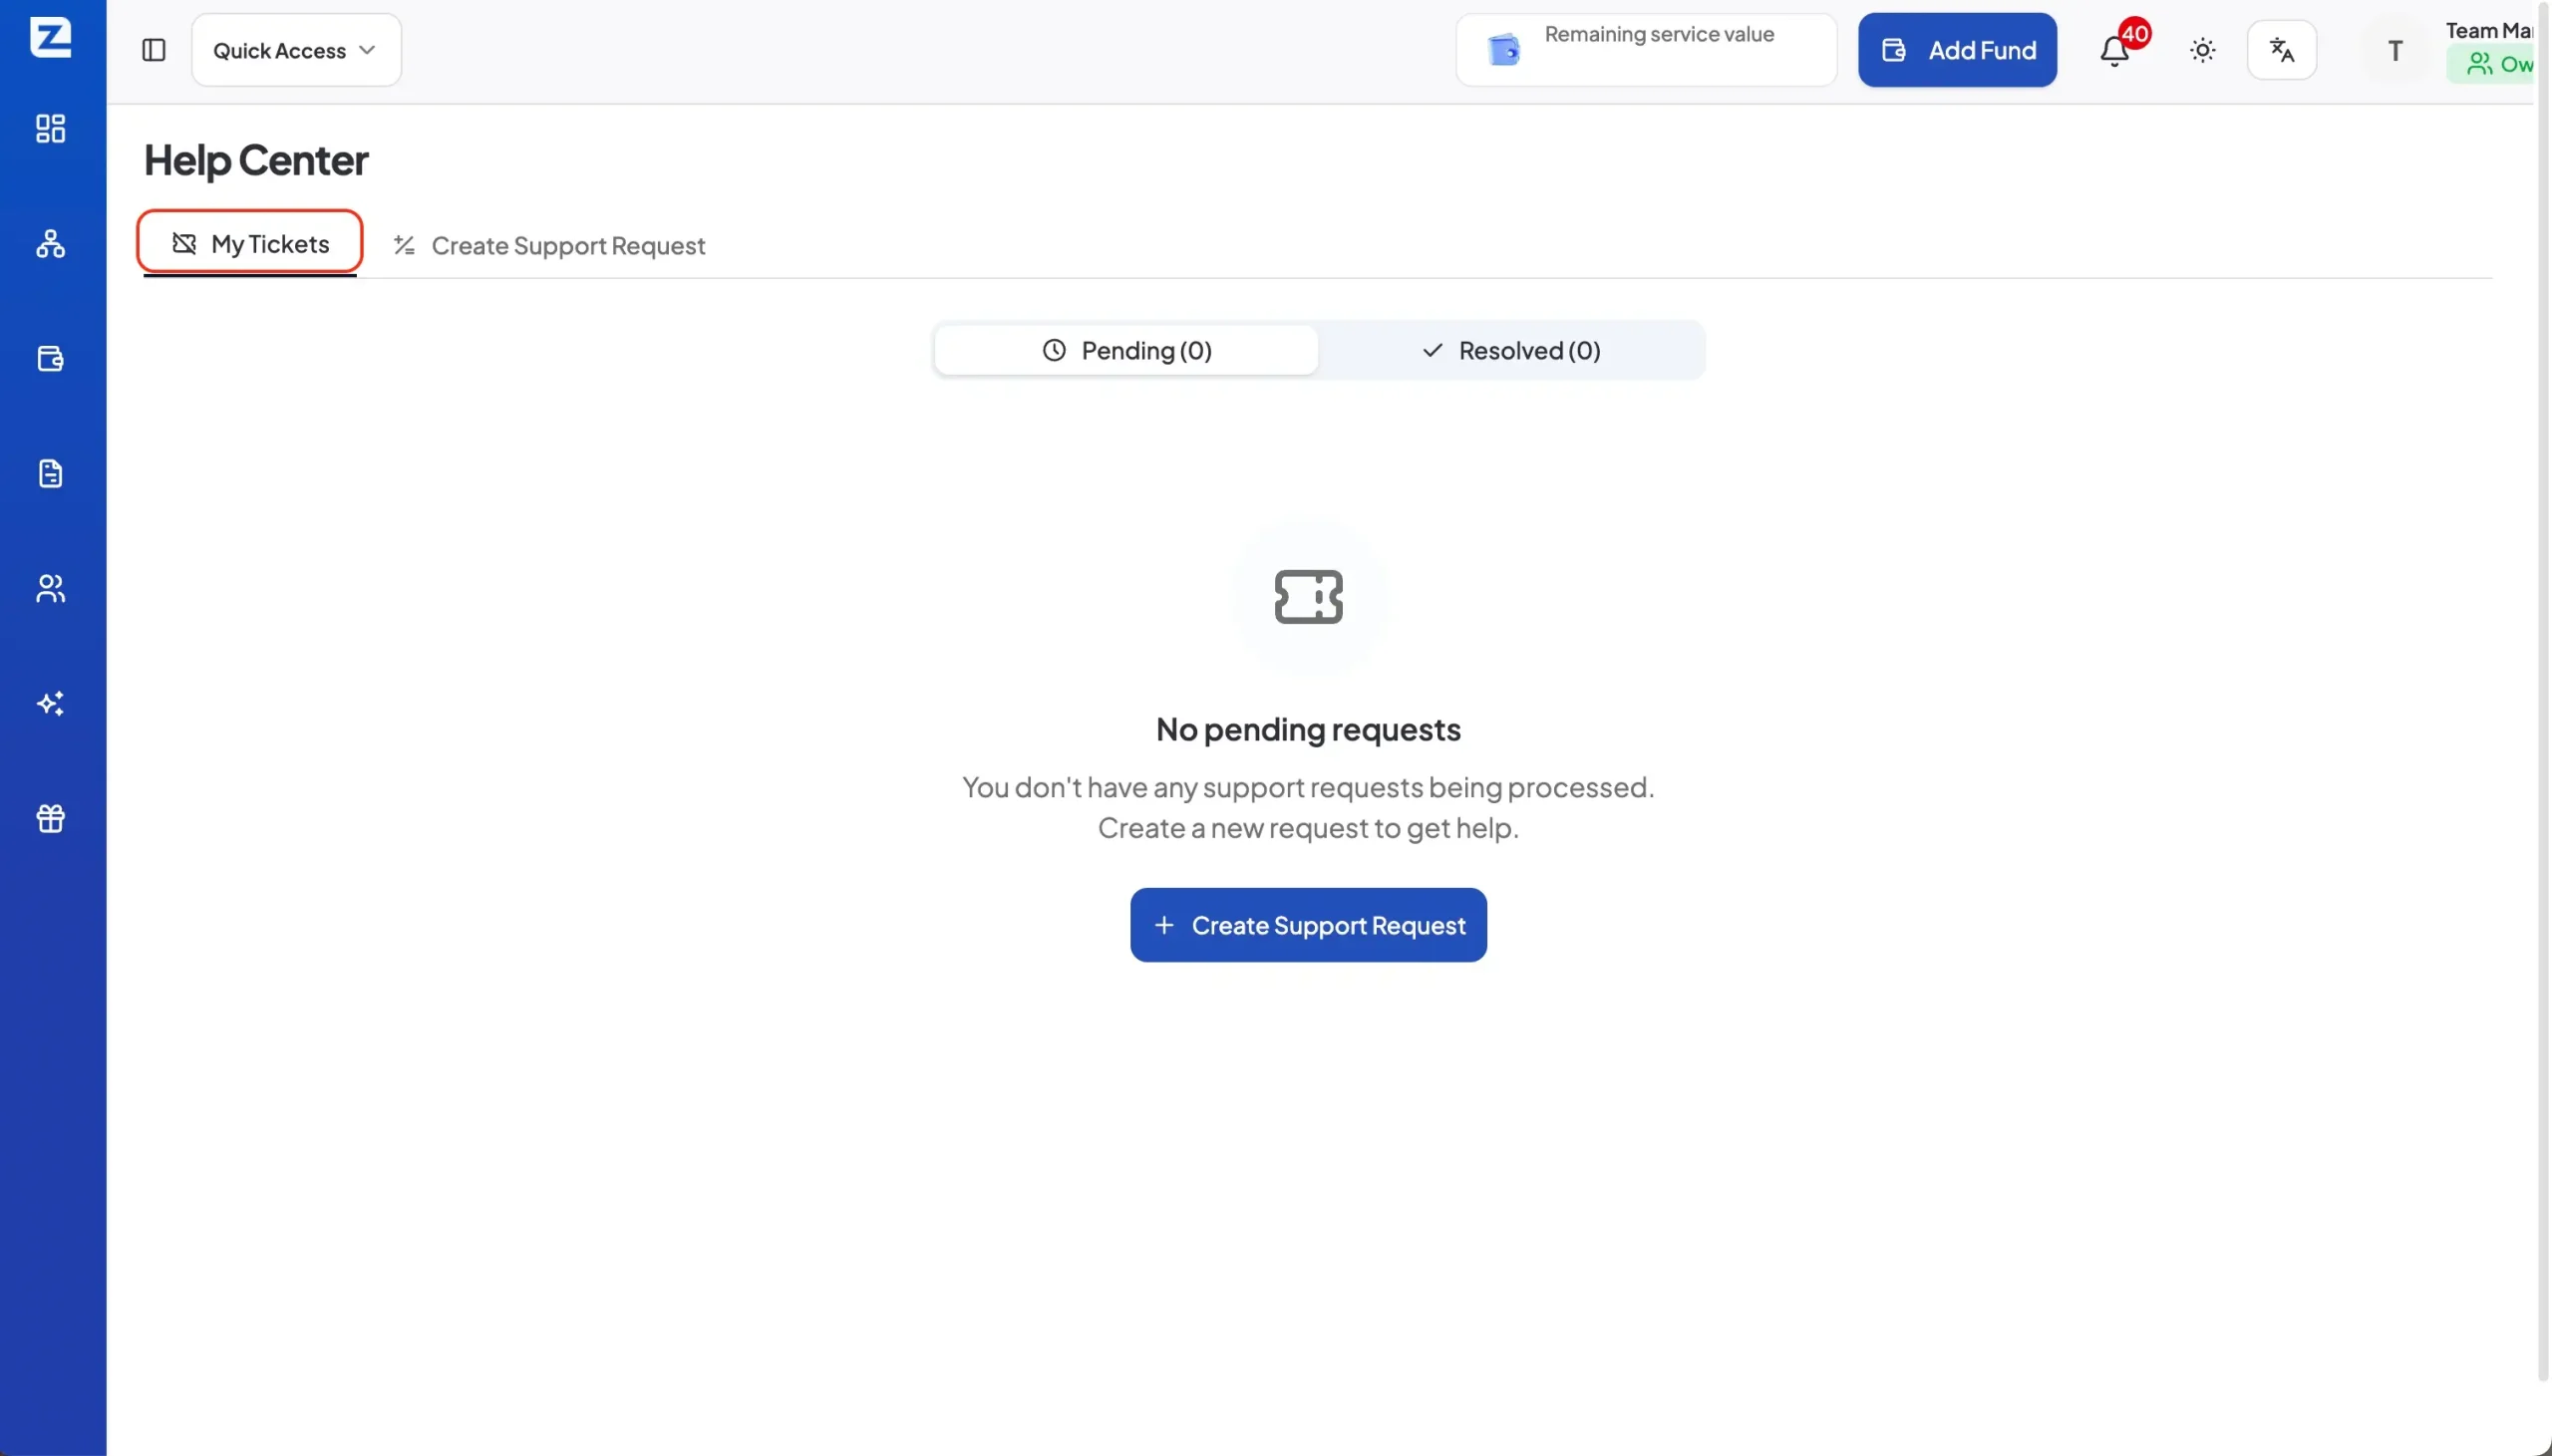
Create Support Request opens the form for a new ticket
The Create Support Request tab opens the form used to submit a new issue. Users can select the relevant platform and category, add a request title, provide detailed information, attach supporting files, and submit the request through one structured workflow.
Step 2: Select Create Support Request
Inside the Help Center, click Create Support Request.
A new form titled Create New Support Request will appear.
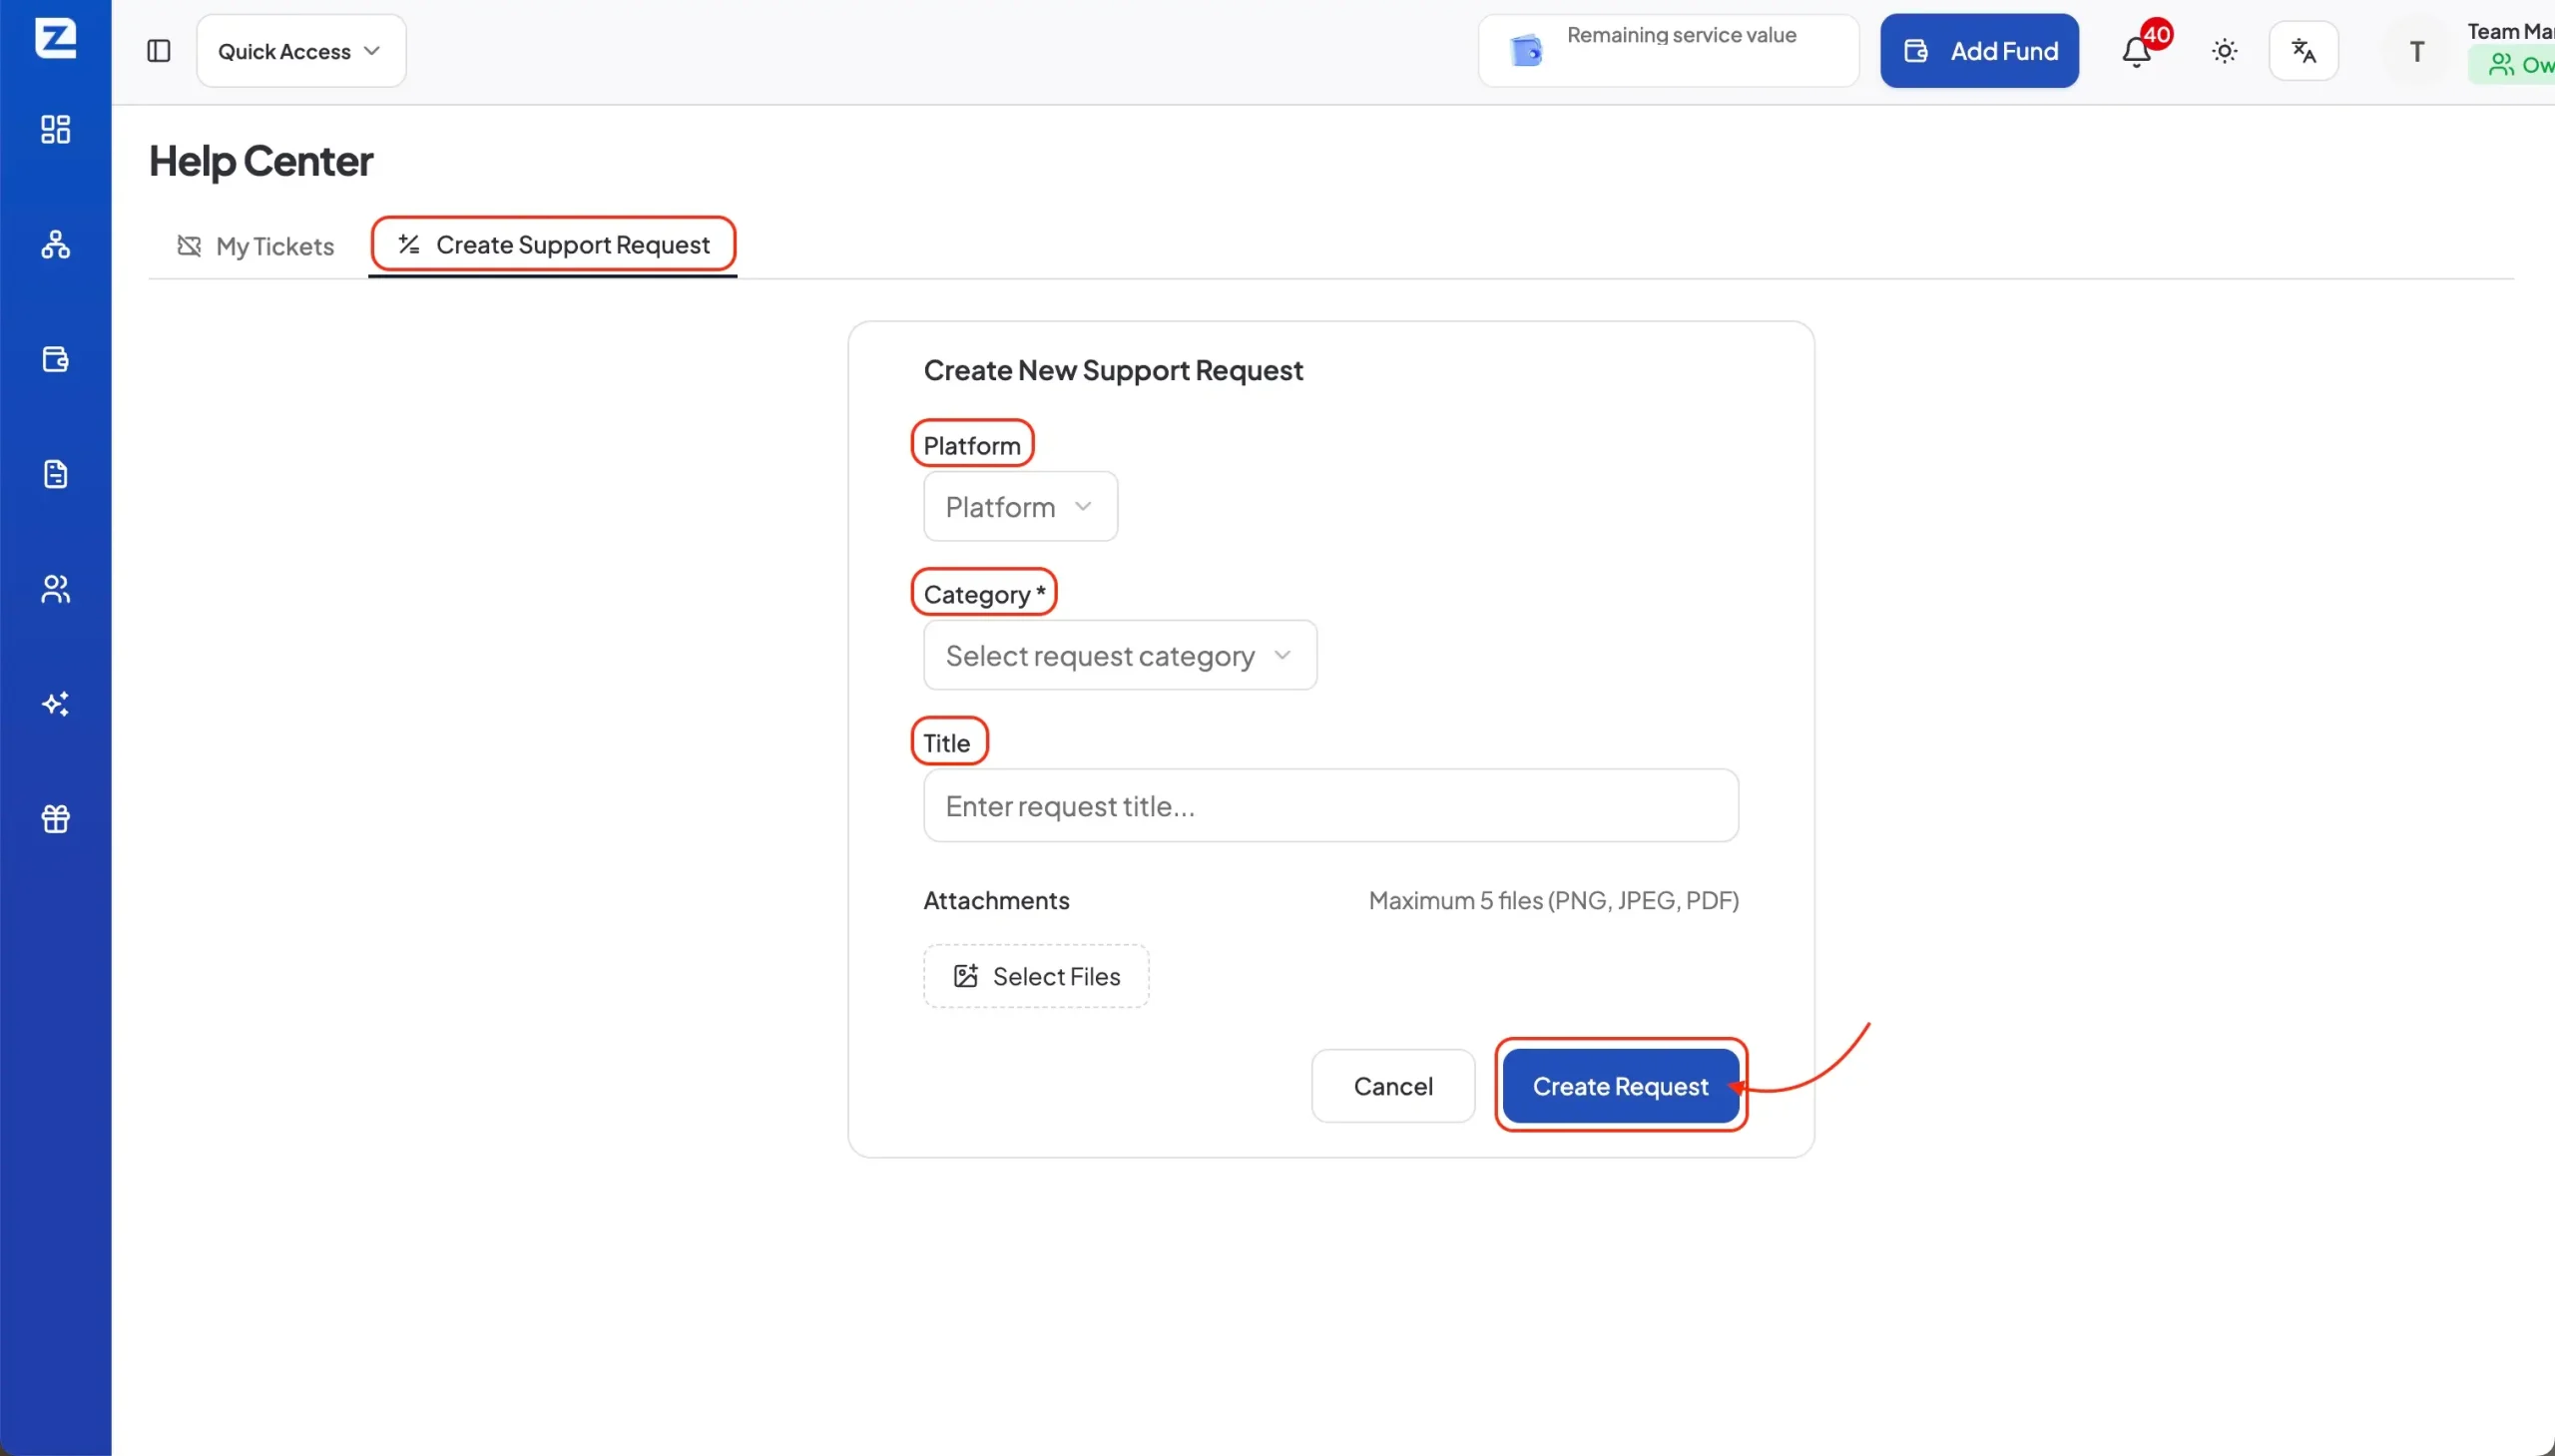
The first fields allow users to identify the general context of the request.
The form includes:
- Platform
- Category
- Title
- Detailed information
- Attachments
- Create Request
The exact detailed fields can change depending on the category selected.
This is useful because an advertising account issue may require different information from a store-related question or another general request.
Before filling in the form, make sure one ticket focuses on one main issue.
Combining several unrelated problems into the same request may make it harder to determine which account, feature, or activity needs attention.
For example, an advertising account access issue and an unrelated store policy question are better treated as separate support contexts.
The objective is not to create the longest ticket possible.
The objective is to create a request that clearly identifies the problem.
Platform and Category help route the support request to the correct context
Selecting the correct Platform and Category is one of the most important parts of creating a support request. These fields define the context of the issue and determine which additional information fields are displayed, allowing users to provide details that better match the type of assistance they need.
Step 3: Select the relevant platform
Start by selecting the platform related to the request.
The screenshots show TikTok as an available platform within the support form.
Choose the platform connected with the issue you are experiencing rather than selecting based on assumptions about what caused the problem.
Select the most relevant Category
Next, choose a Category.
The current Portal interface shows categories including:
- Advertising Account
- Advertising
- Store
- Other Content – Q&A
- Other Requests
The available options help classify the support request before more detailed information is entered.
For example, an issue related to the status or operation of an advertising account should be classified differently from a Store issue or a general question.
Once the category is selected, the Portal may display additional information fields.
This is why Category should be selected based on the actual area where the issue appears.
Detailed fields change according to the selected request type
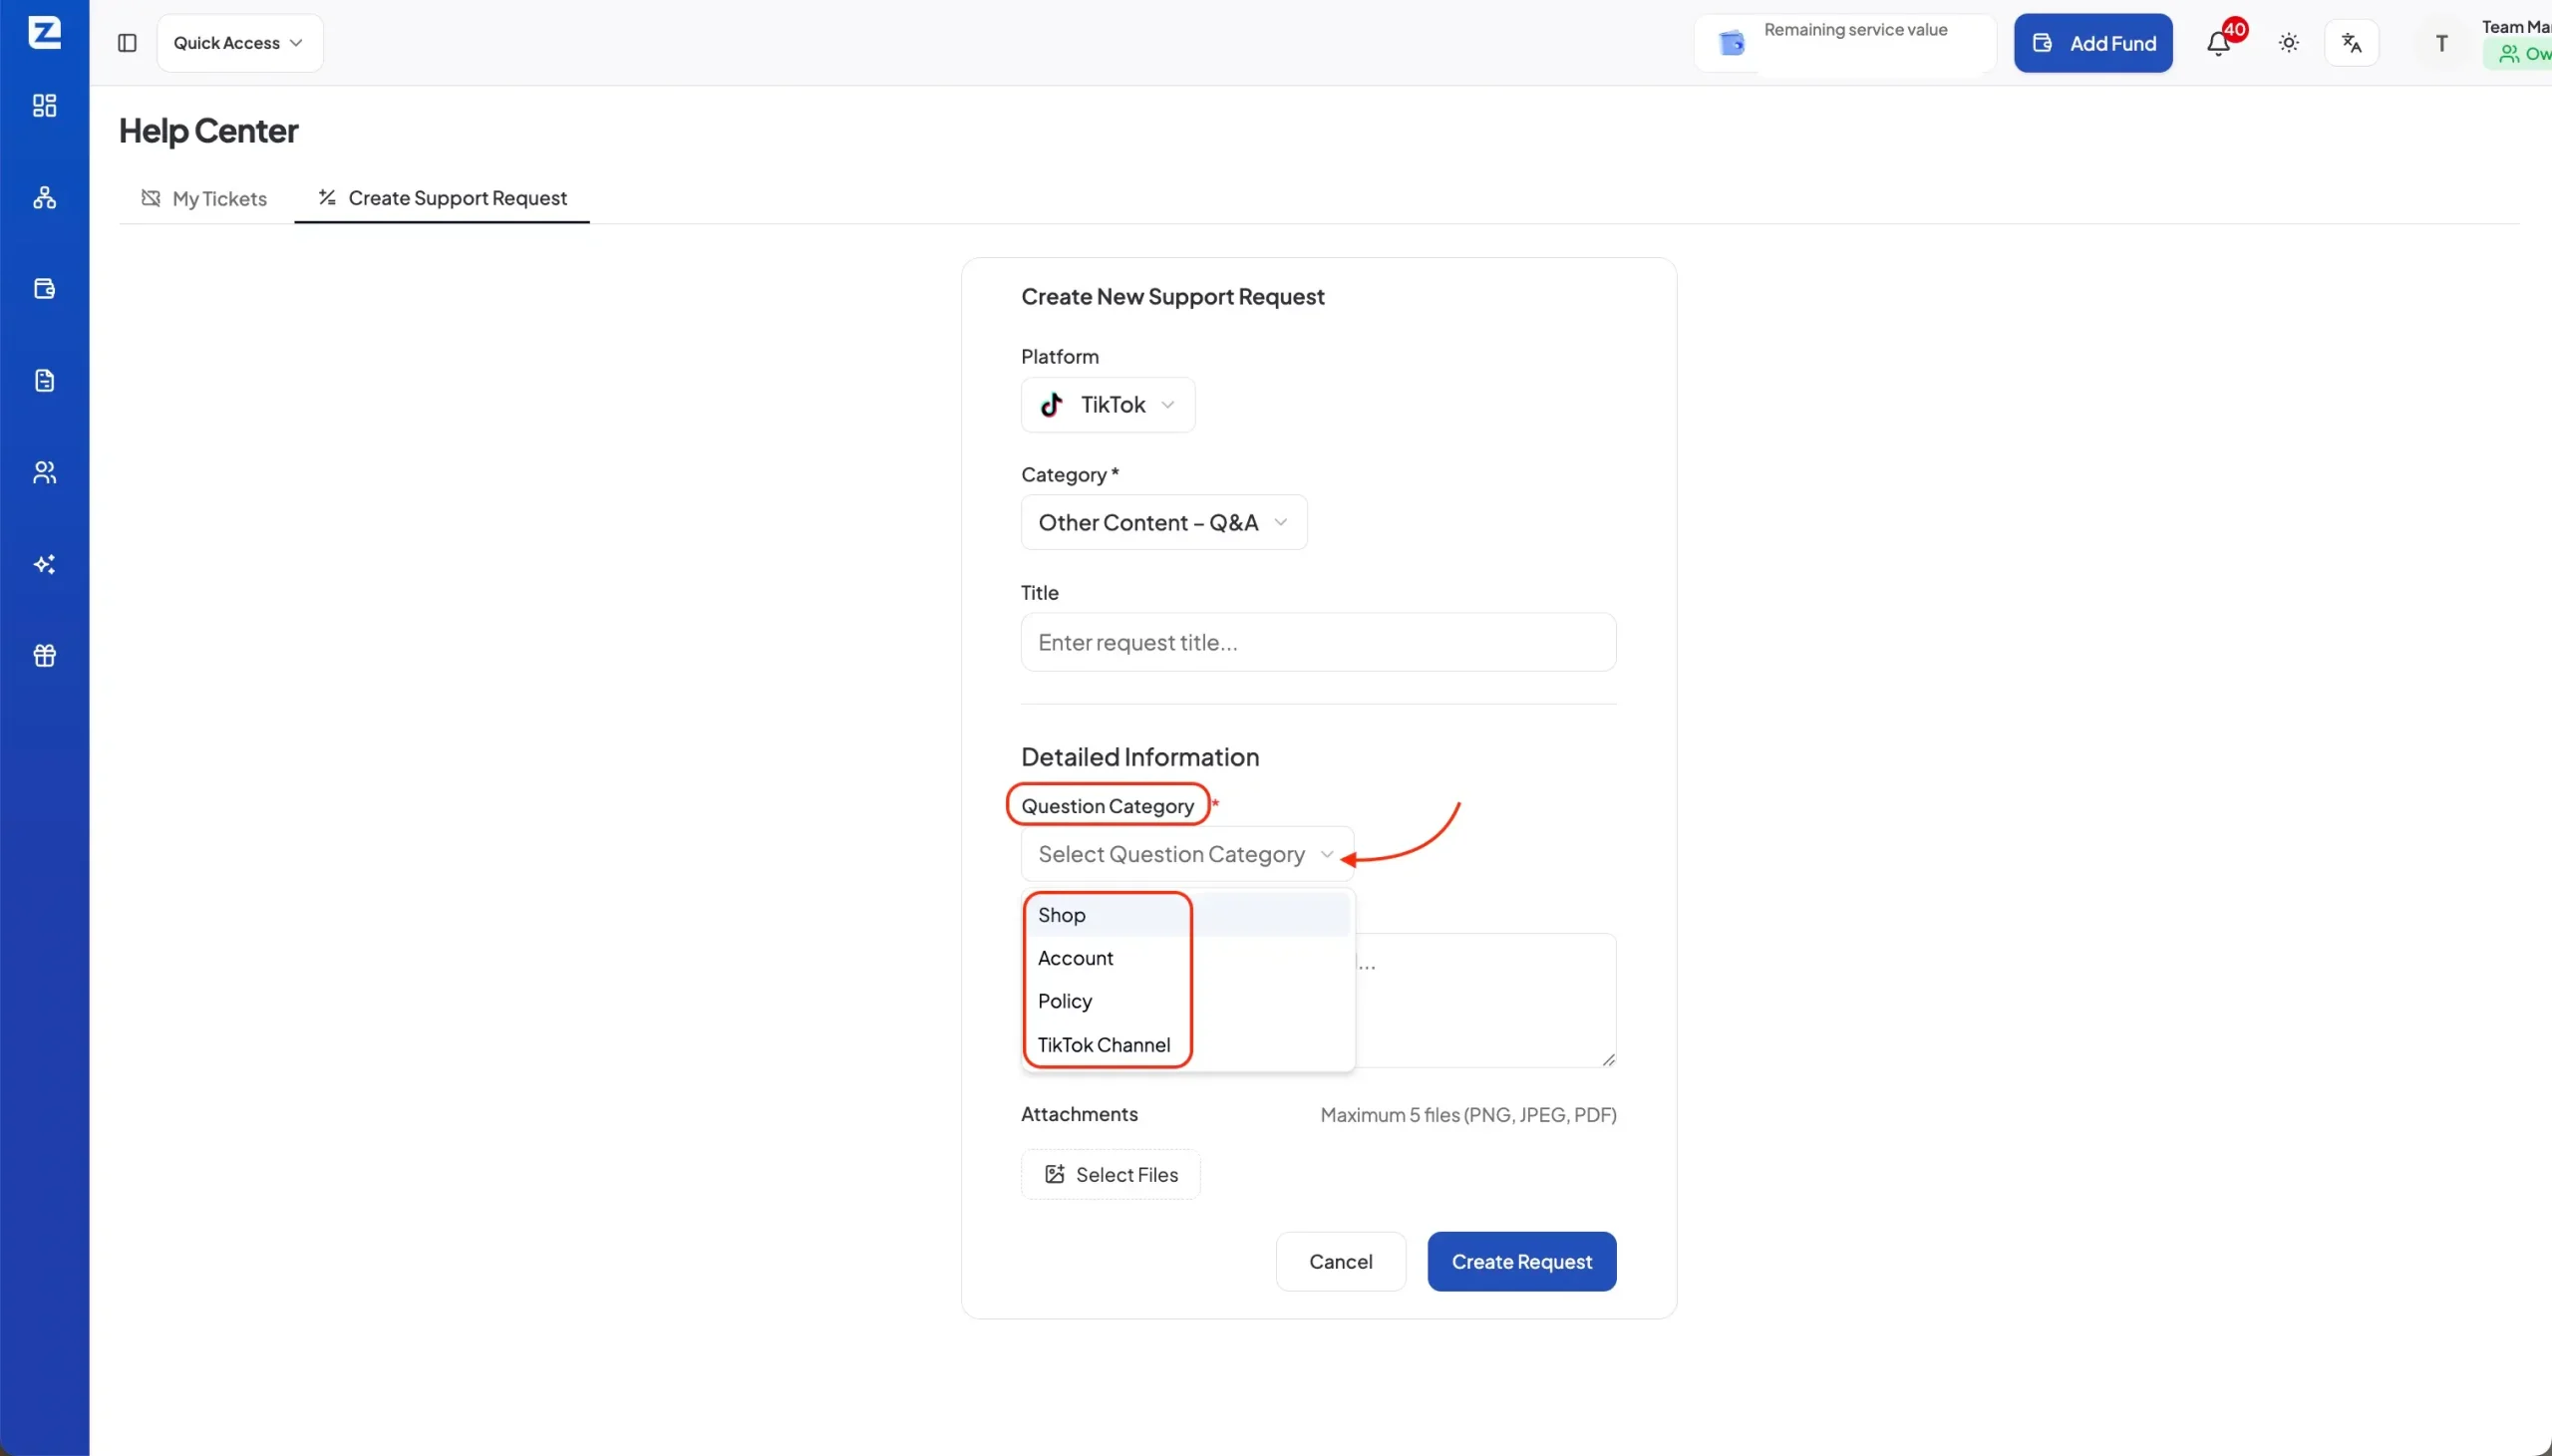
The screenshots also show a Question Category field under the detailed information section.
For the example shown in the Portal, available question categories include:
- Store
- Account
- Policy
- TikTok Channel
These additional selections allow the request to become more specific.
A broad Category identifies the main area of the issue, while a more detailed Question Category helps narrow down what the user needs support with.
This structure reduces the need to explain the entire context manually in the description.
Instead, the Portal first captures structured information, and the user can then explain what happened in the detailed description field.
Clear issue details and attachments make a request easier to understand
A useful support request explains what happened in a simple sequence: the context, the action taken, the expected result, and the actual result. Users can also upload screenshots or documents when visual evidence makes the issue easier to understand.
Enter a clear Title
The Title should summarize the main issue in a few words.
Avoid vague titles such as:
“Need help”
or:
“Account issue”
A stronger title identifies both the area and the problem.
For example:
“TikTok ad account status not updating”
or:
“Unable to complete advertising account action”
The title does not need to explain everything. Its purpose is to make the request easy to recognize in My Tickets later.
Describe the issue using observable information
In the Detailed Issue Description field, explain what actually happened.
A practical structure is:
Context → Action → Expected result → Actual result
For example:
“I was reviewing TikTok advertising account [account information]. After completing [action], I expected the account status to update, but the Portal continued to display [actual result].”
This format gives the support team useful context without unnecessary background.
If an exact error message appears, copy the wording as accurately as possible.
Do not replace observable information with an assumption.
Instead of writing:
“The system is broken.”
Describe what the system actually displayed or failed to do.
Add accurate account information when relevant
Businesses and agencies often operate more than one account.
For this reason, avoid referring only to “my account” when the form provides an opportunity to identify a specific account, transaction, store, or activity.
Accurate identifiers make the request easier to distinguish from other Portal activity.
This is especially relevant for global advertisers working across several GEOs.
A team may have separate accounts for South Africa, Nigeria, Spain, Italy, or other markets. The support request should make it clear which operation is affected.
Attach supporting evidence when it improves clarity
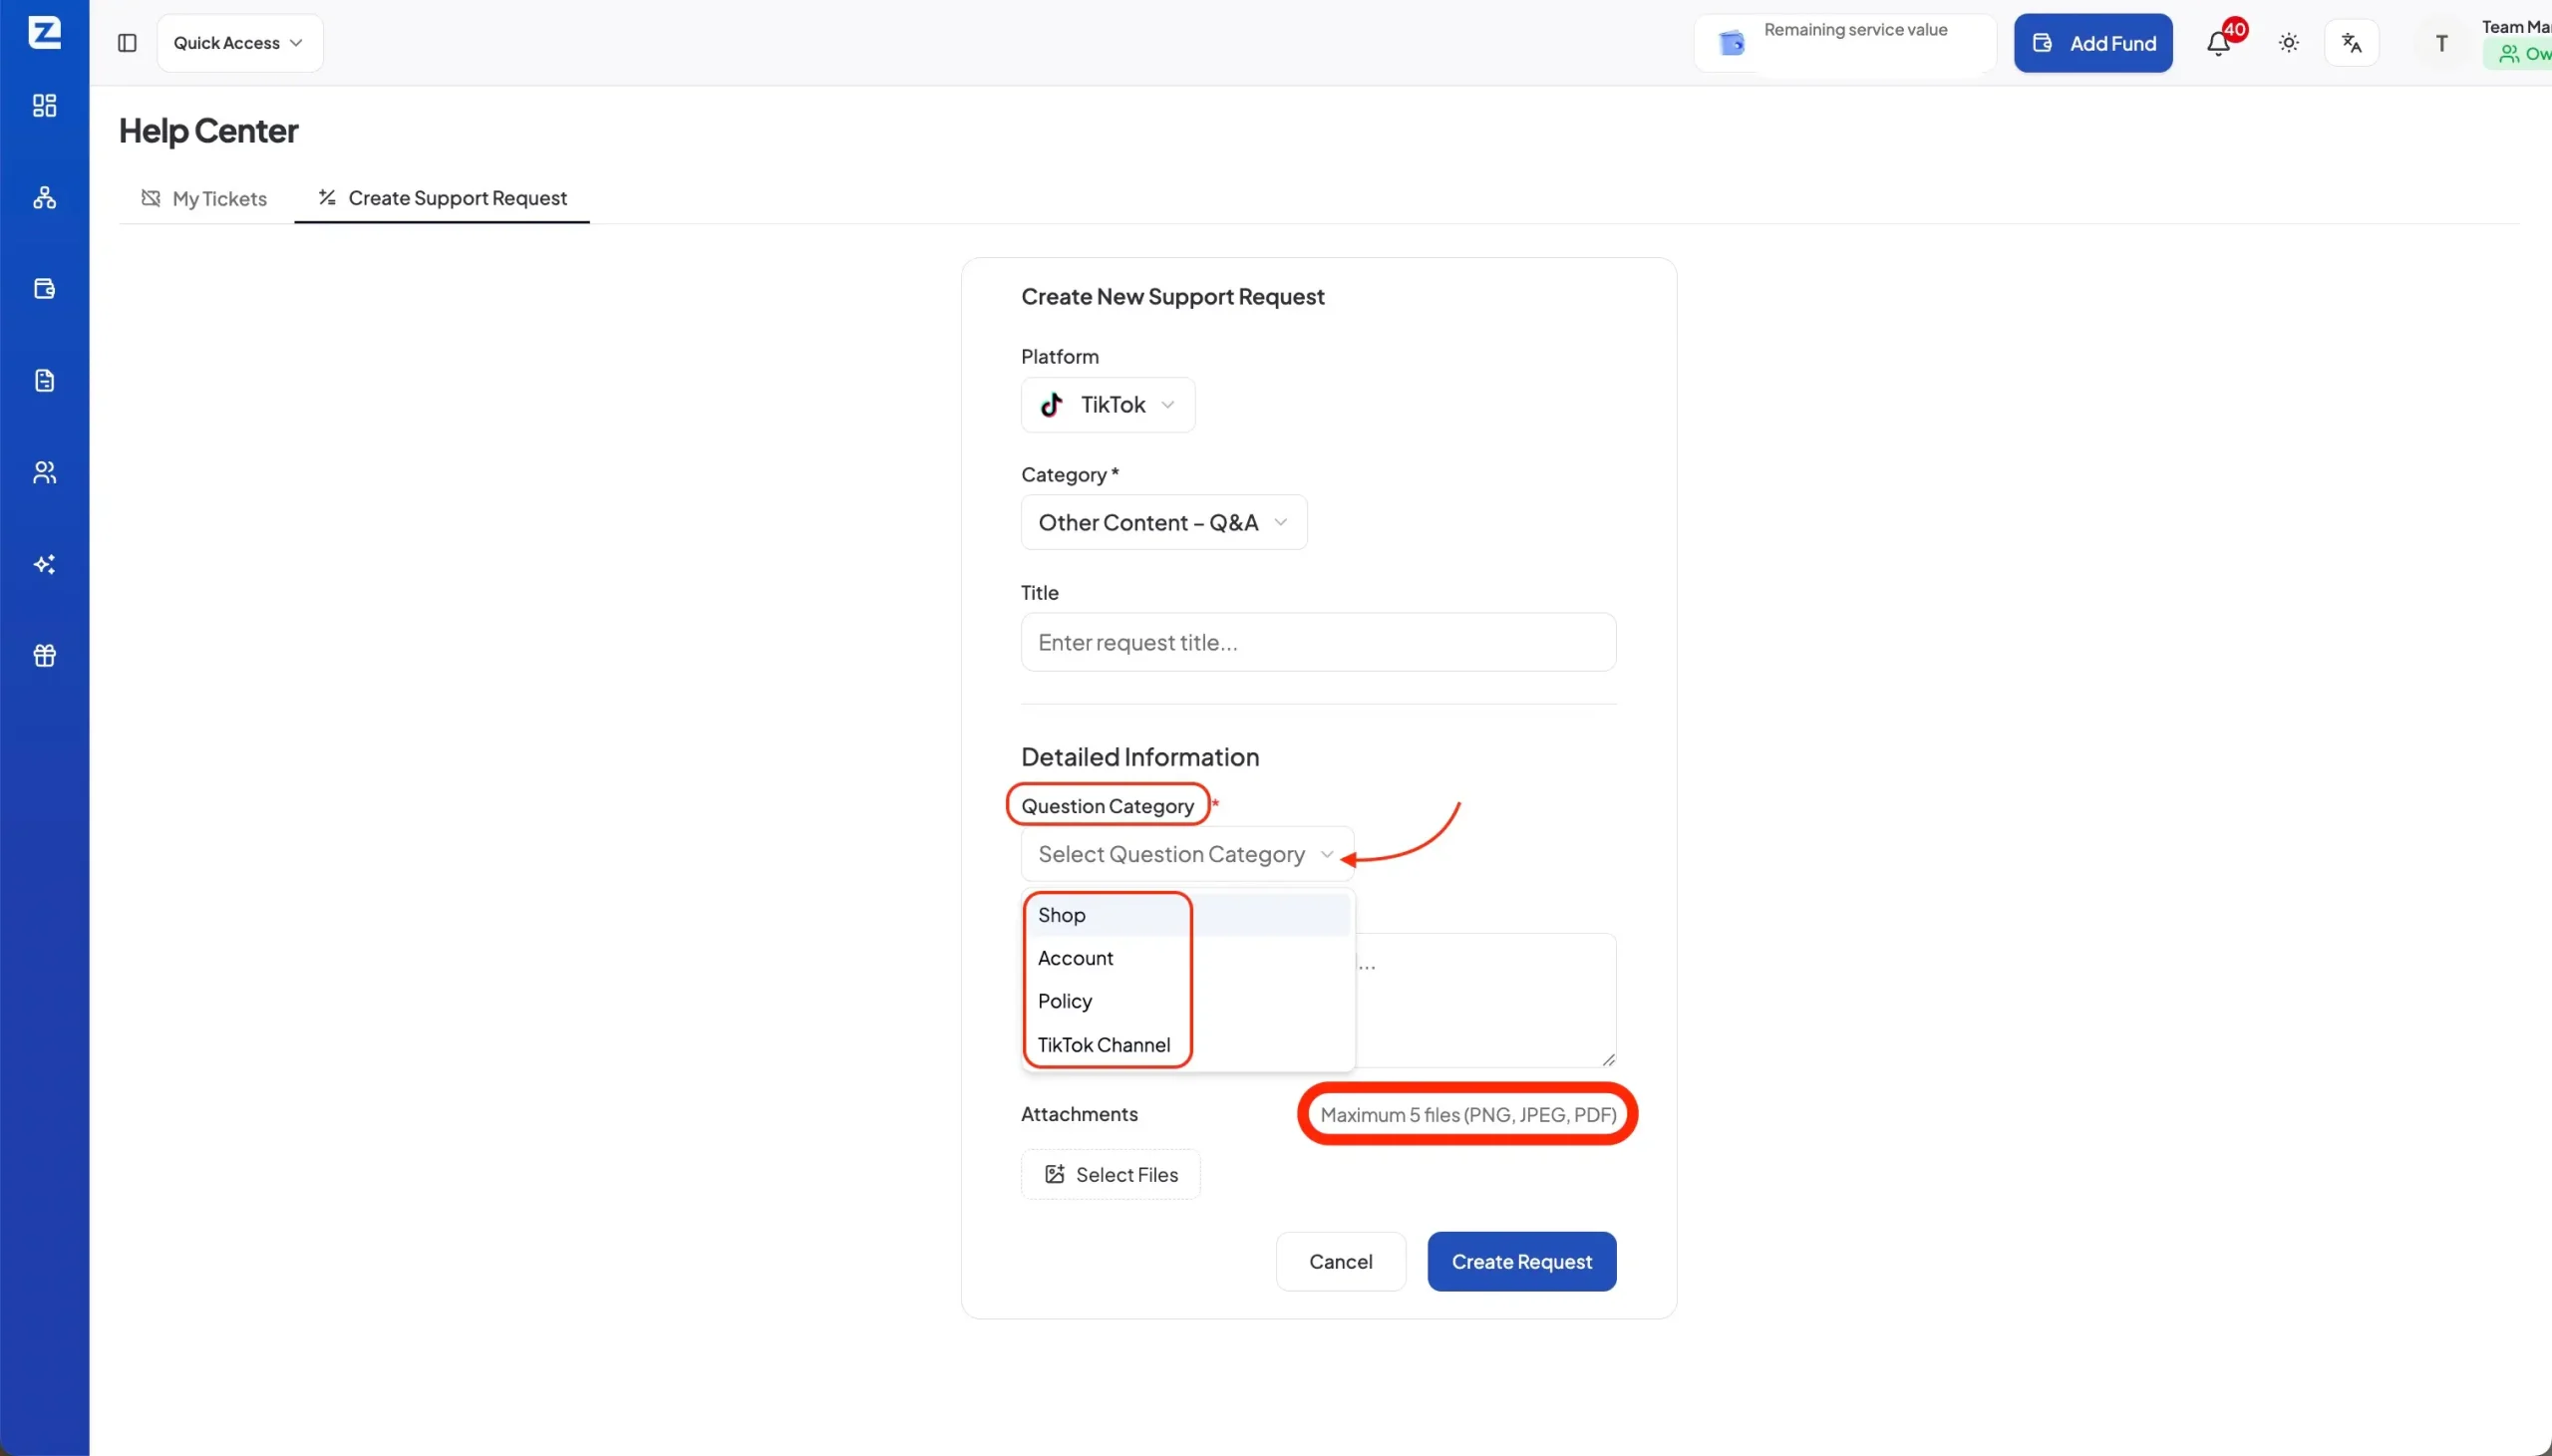
Zafago Portal allows users to attach up to 5 files to a support request.
The supported formats shown in the interface are:
PNG, JPEG, and PDF.
Screenshots can be particularly useful when the issue involves a visible error, account status, unexpected Portal behavior, or information that is difficult to describe precisely.
A PDF may be more suitable when relevant information is contained in a document.
Attachments should support the description rather than replace it.
A screenshot without explanation may still leave the reviewer unsure about what part of the image represents the issue.
The description should state what the user expected, what happened, and why the attachment is relevant.
Reviewing the information before Create Request reduces avoidable confusion
After all required information has been entered, users should review the platform, category, title, issue description, and any attachments before clicking Create Request. A short review helps confirm that the ticket identifies the correct account or activity and that no important information has been omitted.
Step 4: Click Create Request
At the bottom of the form, click Create Request to submit the ticket.
Before submission, confirm several key details.
| Check | What to verify |
|---|---|
| Platform | The correct advertising platform is selected |
| Category | The category accurately represents the issue |
| Title | The main problem is easy to identify |
| Detailed information | The issue is described clearly |
| Account context | The affected account or activity is identifiable |
| Attachments | Supporting files are relevant and readable |
A support request does not need to contain a large amount of text.
Specific information is more valuable than length.
For example, this description is short but useful:
“TikTok advertising account [ID] remained in the same status after [action] on August 17. I expected the status to update after completing the action. Screenshot attached.”
It identifies the platform, account, activity, time, expected result, actual result, and supporting evidence. That gives the issue a clear starting point.
Use the screenshot showing the completed Vietnamese support form with:
- Category
- Question Category
- Detailed Issue Description
- Attachments
- Create Request button
This is the best image for the final submission step because it shows almost the entire workflow in one view.
My Tickets lets users track Pending and Resolved support requests
After creating a request, users can return to My Tickets to monitor its status. Zafago Portal separates tickets into Pending and Resolved, giving customers a simple view of requests that are still being processed and those that have already reached a resolved state.
The support workflow does not end when Create Request is clicked.
Users can return to the Help Center and select My Tickets.
The interface provides two status tabs:
Pending
This section is used for support requests that have not yet reached the Resolved status.
Resolved
This section contains requests that have been marked as resolved.
This distinction is useful for users managing several requests over time.
Instead of trying to remember which issues were already handled, the Portal provides a dedicated location for reviewing ticket status.
For agencies, this can also make support activity easier to organize when different team members manage different accounts or clients.
A team member can create a request and later return to the same Help Center to verify its current status.
The My Tickets structure also gives users a more complete support workflow:
Create → Submit → Track → Resolve
This makes Support more than a simple contact form.
It becomes a ticket-based process integrated with the wider Portal experience.
Zafago Portal Support fits naturally into multi-account advertising operations
Zafago Portal Support becomes more useful as businesses manage more accounts, markets, and operational activities. By combining request creation with ticket tracking, the Help Center gives agencies and advertisers a consistent way to report issues without separating support entirely from their advertising management environment.
Advertising operations rarely remain simple as a business scales.
A company might begin with one advertising account.
Later, it may create separate accounts for individual markets, product lines, brands, or campaign structures.
An agency may manage even more accounts across different clients.
At that scale, support also needs context.
A ticket should identify the relevant platform, account, category, and observed issue instead of depending on informal conversations.
The structured fields in Zafago Portal help users provide that context.
This is particularly useful for customers using Rent TikTok Agency Ad Account, because account management can involve more than simply receiving access to an advertising account.
Users may also need a reliable workflow for identifying account-related issues and submitting the information needed for support.
The same applies to TikTok Advertising Account Management.
When advertising operations involve multiple accounts, countries, balances, users, and campaign activities, having support inside the same operational ecosystem can make daily management more organized.
The Portal therefore connects several parts of the advertising workflow. Users can manage accounts, monitor financial activities, organize team access, work with other Portal tools, and submit a structured support request when assistance is required. Support becomes one part of the operating process rather than a separate destination used only when something goes wrong.
Zafago Portal creates a clearer path from issue reporting to ticket tracking
Creating a support request in Zafago Portal follows a clear workflow: enter Support, select Create Support Request, choose the relevant Platform and Category, provide the requested details, attach supporting evidence when necessary, and click Create Request.
The process is simple, but the quality of the information matters.
A clear title, accurate category, specific account context, factual issue description, and relevant attachment can make a ticket much easier to understand.
After submission, users can return to My Tickets to check whether the request is still Pending or has been moved to Resolved.
For businesses operating multiple TikTok or Meta advertising accounts, this structured workflow provides something more useful than a generic contact form.
It creates a repeatable process for identifying an issue, documenting the context, submitting the request, and following its status inside the same Portal used for daily advertising operations.
As advertising operations become larger and more complex, that structure becomes increasingly valuable.
FAQ
Zafago Portal Support uses a structured ticket process that starts from the Help Center and continues through My Tickets. Users can select a platform and category, enter detailed information, attach supporting files, submit the ticket, and later monitor whether the request remains Pending or has moved to Resolved.
Zafago Portal Support is available from the account menu
Users can open the account menu in the upper-right area of Zafago Portal and select Support.
This opens the Help Center.
Help Center includes My Tickets and Create Support Request
The Help Center is divided into two primary areas.
My Tickets allows users to review existing requests, while Create Support Request is used to submit a new ticket.
Support requests can be organized by Platform and Category
The creation form includes Platform and Category fields.
Available categories shown in the current Portal interface include Advertising Account, Advertising, Store, Other Content – Q&A, and Other Requests.
Additional detailed fields may appear after a category is selected.
Zafago Portal accepts supporting files with a request
Users can attach up to five files.
The interface currently lists PNG, JPEG, and PDF as supported formats.
Attachments can help provide evidence when the issue involves visible errors, account information, or other details that are easier to demonstrate than describe.
My Tickets separates requests into Pending and Resolved
After submission, users can return to My Tickets.
Requests are organized between Pending and Resolved statuses, making it easier to follow the progress of previously submitted tickets.
ZAFAGO GLOBAL – Digital Growth Partner
Zafago Global is a Performance Digital Marketing Agency dedicated to partnering with businesses to optimize strategies and drive sustainable revenue growth.
 Office: 21st Floor CMA Building 64 Connaught Road Central, Hong Kong 999077
 Hotline :(+84) 888-025-050
 Email: biz@zafagodigital.com